Skip to content
Request a Quote

My Account

  • United States
    • English Europe
    • Français
    • Español
    • Deutsch
    • Nederlands
    • Asia-Pacific
  • Dickson environmental monitoring & compliance experts logo
  • Solutions
        • Explore solutions built for your industry

          Dickson provides comprehensive environmental monitoring solutions, including software, equipment, and services, for industries requiring regulatory compliance worldwide.

        • Learn More
        • By Use
          • Temperature Monitoring & Measurement
          • Absolute & Differential Pressure Monitoring
          • Relative Humidity Monitoring
          • CO₂ Monitoring and Measuring
          • Vaccine Storage Monitoring
          • Cleanroom Monitoring
          • Cold Room & Refrigeration Monitoring
          • Laboratory Monitoring
          • Ambient Monitoring
          • Chamber Monitoring
          • Incubator Monitoring
        • By Industry
          • Pharmaceutical
          • Research
          • Medical Devices
          • Hospital & Healthcare
          • Cold Chain & Third-Party Logistics
          • Manufacturing & Production
          • Food & Beverage
          • Aerospace
        • Monitoring Solutions
          • DicksonOne
            • DicksonOne Mobile App
          • Dickson Mapping Suite
          • OCEAView™ On-Premise
          • Transition to OCEAView from ThermoServer
  • Products
    • Data Loggers
      • Wi-Fi Data Loggers
      • LoRaWAN Data Loggers
      • Bluetooth Data Loggers
      • USB Data Loggers
    • Sensors
      • Temperature Sensors
      • Humidity Sensors
      • CO2 Sensors
    • Chart Recorders & Supplies
      • Temperature Chart Recorders
      • Humidity Chart Recorders
      • Pressure Chart Recorders
      • Chart Recorder Charts and Pens
    • Software
    • Accessories
  • Services
    • Calibration
      • Calibration Club
    • Installation
    • Validation
    • Training
    • Mapping
      • Dickson Mapping Suite
    • Expert Care
      • 24/7 Care by Dickson
      • TotalCare by Dickson
      • UltraCare by Dickson
      • UltraCare + Validation by Dickson
  • Resources
        • Support
          • Knowledge Base
          • Manuals
        • Library
          • Blog
          • Whitepapers
          • Press Room
        • Compliance
          • A2LA Certificate
          • ISO 9001 Certification
          • Sustainability at Dickson
          • FDA 21 CFR Part 11
          • GxP Compliance
  • About
    • About Us
    • Catalog
    • Locations
    • Careers
  • Contact Us
  • My Account
  • United States
    • English Europe
    • Français
    • Español
    • Deutsch
    • Nederlands
    • Asia-Pacific
  • 0
0

Request a Demo

Dickson environmental monitoring & compliance experts logo
  • Dickson environmental monitoring & compliance experts logo
  • Solutions
        • Explore solutions built for your industry

          Dickson provides comprehensive environmental monitoring solutions, including software, equipment, and services, for industries requiring regulatory compliance worldwide.

        • Learn More
        • By Use
          • Temperature Monitoring & Measurement
          • Absolute & Differential Pressure Monitoring
          • Relative Humidity Monitoring
          • CO₂ Monitoring and Measuring
          • Vaccine Storage Monitoring
          • Cleanroom Monitoring
          • Cold Room & Refrigeration Monitoring
          • Laboratory Monitoring
          • Ambient Monitoring
          • Chamber Monitoring
          • Incubator Monitoring
        • By Industry
          • Pharmaceutical
          • Research
          • Medical Devices
          • Hospital & Healthcare
          • Cold Chain & Third-Party Logistics
          • Manufacturing & Production
          • Food & Beverage
          • Aerospace
        • Monitoring Solutions
          • DicksonOne
            • DicksonOne Mobile App
          • Dickson Mapping Suite
          • OCEAView™ On-Premise
          • Transition to OCEAView from ThermoServer
  • Products
    • Data Loggers
      • Wi-Fi Data Loggers
      • LoRaWAN Data Loggers
      • Bluetooth Data Loggers
      • USB Data Loggers
    • Sensors
      • Temperature Sensors
      • Humidity Sensors
      • CO2 Sensors
    • Chart Recorders & Supplies
      • Temperature Chart Recorders
      • Humidity Chart Recorders
      • Pressure Chart Recorders
      • Chart Recorder Charts and Pens
    • Software
    • Accessories
  • Services
    • Calibration
      • Calibration Club
    • Installation
    • Validation
    • Training
    • Mapping
      • Dickson Mapping Suite
    • Expert Care
      • 24/7 Care by Dickson
      • TotalCare by Dickson
      • UltraCare by Dickson
      • UltraCare + Validation by Dickson
  • Resources
        • Support
          • Knowledge Base
          • Manuals
        • Library
          • Blog
          • Whitepapers
          • Press Room
        • Compliance
          • A2LA Certificate
          • ISO 9001 Certification
          • Sustainability at Dickson
          • FDA 21 CFR Part 11
          • GxP Compliance
  • About
    • About Us
    • Catalog
    • Locations
    • Careers
  • Contact Us
  • My Account
  • United States
    • English Europe
    • Français
    • Español
    • Deutsch
    • Nederlands
    • Asia-Pacific
  • 0

Dickson Support Database

DicksonOne

  • Devices
    • Reset the Min/Max On a Device
    • Replace a Device
    • Export the Device Graph
    • Download Data Manually from a Device
    • Device Loses Power or Loses Network Connection
    • Delete a Device
    • Archive a Device
    • Understand the Device Summary Data
    • Add Devices
    • Change Device Settings
    • Find the MAC Address of a Device
  • Cobalt Loggers
    • Dickson LoRaWAN Gateway User Guide
    • Cobalt XS Quick Start Guide
    • Cobalt X Quick Start Guide
  • DWE (WiFi & Ethernet)
    • DWE Quick Start Guide
    • Turn HTTPS ON/OFF
    • Find the MAC Address of a Device
    • DWE Error Codes
    • DWE/2 Black Button Above Sensor
  • Account and Billing
    • Subscribe to DicksonOne Emails
    • Purchase a DicksonOne System
    • Expired Subscription
    • Activating an Account with Monthly Credit/Debit Card Billing
    • Account Owner and Manage Access User
    • Single Sign On
    • Accessing and Enabling API Keys
    • DicksonOne Account Features
    • Default Device Settings
    • Create Your DicksonOne Account
    • Credit Card Payment Failed – Stripe
    • Getting Started with DicksonOne
  • Interface
    • Equipment
    • Understand the Device Graph
    • Sensor Information and Behaviors
    • Audit Trail
    • Add or Remove Reference Lines
    • Monitoring Points
    • Dashboards
    • Custom Dashboards
    • Floor Plans
  • Touchscreen (WiFi & Ethernet, AC Power)
    • Set a Passcode
    • Export Data from the Touchscreen Data Logger
    • Touchscreen (TWE/TWP and TSB) Quick Start Guide
  • RF System (RFL Data Logger & Gateway)
    • RF Gateway Quick Start Guide
    • RF Logger Quick Start Guide
    • RF System Troubleshooting
    • Deleting a RF Gateway
    • RF Logger Firmware Updates
    • RF Gateway Firmware Updates
    • Exporting Data from the RF Logger
    • Register RF Loggers
    • Register an RF Gateway
    • Securing the LoRaWAN RF Gateway
  • Network and Technical
    • Connect a Device to Ethernet
    • Change Logs
    • IT Requirements and Notes
    • Turn HTTPS ON/OFF
    • DWE Error Codes
    • WiFi vs. Ethernet
    • Creating WiFi Settings Files
    • Find the MAC Address of a Device
  • Firmware and Hardware
    • Replace a Device
    • Replaceable Sensor Disconnect
    • Replacing the Sensor on a Device
    • Connect a Device to WiFi
    • Connect a Device to Ethernet
    • Relay Sensor Wiring Diagram
    • Manage Firmware Settings
    • Update the Device Firmware
  • Users and Contacts
    • User Roles
    • Suspend a User
    • Edit or Delete a User/Contact
    • Add a Contact
    • Add a New User
    • User Access and Permissions
  • Locations
    • Get Started With Locations and General Structure
    • Add or Delete a Location
  • Exports and Reports
    • Select the Right Report
    • Create a Report
    • View Report History
    • Edit Recipients On a Report
    • Edit a Report
    • Export the Device Data
    • Export the Account Data
  • Twilio Integration Overview
    • Twilio Integration FAQs
    • Sub-Accounts within Twilio
    • Disconnect Your Twilio Account From DicksonOne
    • Set a Twilio Rate Limit
    • Best Practices And Reducing Twilio Costs
    • Connect Your Twilio Account to DicksonOne
    • Creating a Twilio Account
    • Country Codes Requiring a Twilio Account Integration
    • Twilio Troubleshooting
    • Twilio Integration Overview
  • Alarms and Notifications
    • Single Alarm Pause and Bulk Alarm Pause
    • Bulk Acknowledgement and Commenting
    • Alert Snooze
    • Alert Reasons
    • Too Many Escalations for a Given Condition
    • Alarm Escalation
    • Create a Template from an Existing Device’s Alarm
    • Apply an Alarm Template to Multiple Devices
    • Apply an Alarm Template to a Device
    • Alarm Options
    • Alarm Delay Behavior
    • Delete an Alarm/Unapply Alarm Template from a Device​
    • Edit Alarms
    • Create a Not Reporting Alarm
    • Create a Custom Alarm
    • Create an Alarm Template
    • Warnings vs. Excursions
    • Creating Alarm Schedules
    • Review and Acknowledge Alarm Alerts
  • Follet Refrigerator and Freezer Integration
    • Download these instructions as a PDF
    • FAQ’s
    • Installing the Network card
    • Connect to Dickson One
    • Setup
    • Follett Network Interface Card Overview and Requirements
  • Helmer iSeries Equipment Integration
    • Connect your iSeries Equipment to DicksonOne (Advanced)
    • Troubleshooting an iSeries Integration
    • Connect your iSeries Equipment to DicksonOne (Basic/DHCP)

Chart Recorders

  • Why Did the Chart Stop Turning?
  • How to Change Charts
  • Why Isn’t the Chart Keeping Time or Running Slow?
  • Why are the Pen Traces Erratic?
  • How to Change Pens
  • Why Won’t the Chart Recorder Rotate?

Legacy Products

  • WiZARD2
    • How to move a WiZARD2 system to a new PC without losing data
    • WiZARD2 software locked up while adding a device
    • WiZARD Ethernet Installation and Usage

Manuals

  • Chart Recorders Manuals
    • VFC70 Manual
    • SC3 Manual
    • PW8 Manual
    • PW4 Manual
    • KT856 Manual
    • SL4/SK4 Manual
    • TH8 Manual
    • New 8″ Chart Recorders (Various models prefaced with TH8 and KT8) Manual
    • KT8 Manual
    • KT6 Manual
    • ET855 Manual
  • Data Loggers
    • PR150/350 Manual
    • SK550/TK550 Manual
    • SP425/TP425 Manual
    • TM320/325 Manual
    • SM300/320/325/420 Manual
    • TSB Manual
    • PR525 Manual
    • PR325 Manual
    • PR125 Manual
    • DWE Manual
    • HT350 Manual
    • TP125 Manual
    • SP125/SP175 Manual
    • HT300 Manual
    • DSB Manual
    • ES120 Manual
    • DBL Manual
  • Other
    • TC700/TH700 Manual
    • RL200 Manual
  • Wizard2
    • Wizard2 Manual

USB Logger Support

  • -DSB
    • DSB Troubleshooting
  • -DBL
    • DBL Troubleshooting

DicksonOne Mapping

  • Create Mapping Study
  • DicksonOne Mapping Quick Start Guide

Oceaview Resources

  • Oceaview Guides
    • Oceaview Guides
View Categories
  • Home
  • Dickson Support
  • DicksonOne
  • Interface
  • Custom Dashboards

Custom Dashboards

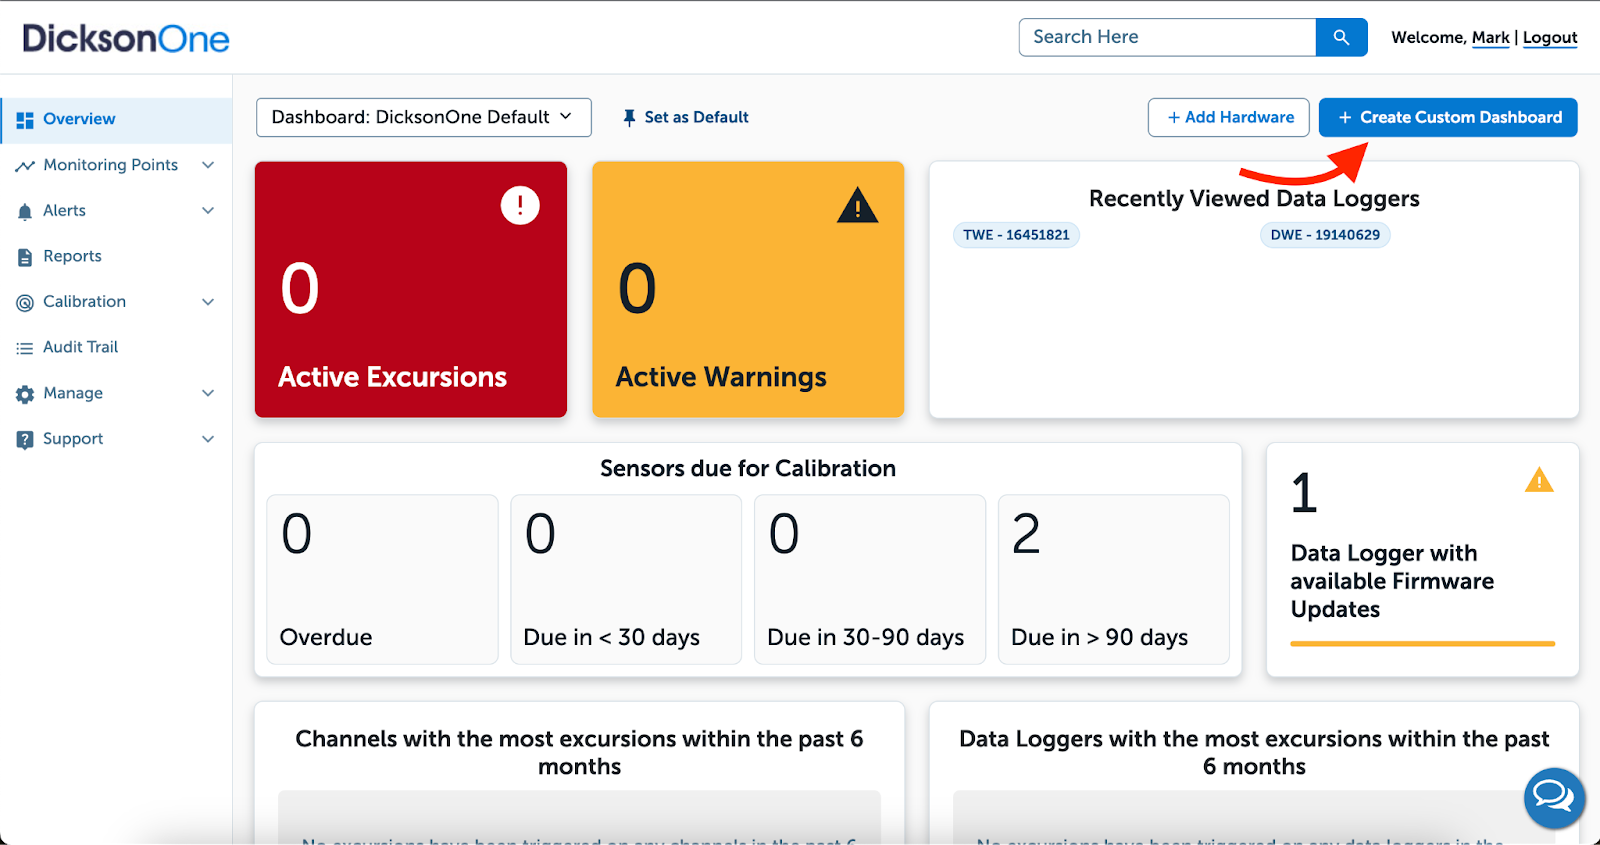
Creating a Custom Dashboard

About Custom Dashboards #

  • Custom Dashboards provide the ability to create a tailored view of data.
  • Users may override the default view, which displays upon login, with their created Custom Dashboards.
  • Users may limit who can view their custom dashboards with sharing controls. 

How to Create a Custom Dashboard #

  1. From the Overview screen, select Create Custom Dashboard in the top right corner.
  1. Begin by entering the Custom Dashboard Name. 
  2. Select a pixel Display Size
    1. Small – 1920×1080 (Chromebook or similar)
    2. Medium – 2160×1440 (External computer monitor or similar)
    3. Large – 3840×2160 (4K TV or similar)
  3. Choose how you plan to utilize your display by choosing Horizontal or Vertical orientation.
  4. Choose the Time Zone where the display will be mounted.
  5. Select a Time Frame of Reference, which filters out loggers that have not reported data within the specified time frame. 
  6. Select Create Custom Dashboard.

Widgets #

About Dashboard Widgets #

  • Custom Dashboards can be composed of any combination of Location, Floor Plan, Logger or Equipment, Channel, or Alert widgets.
  • Widgets may be resized, rearranged, or deleted to fit the specific needs of your dashboard. 

Currently available widgets:

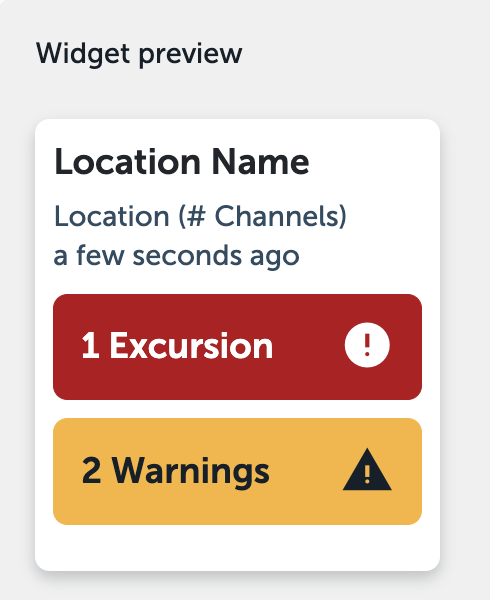
  • Location – Location widgets provide at a glance status for the selected location. It will show active Warnings, Excursions, or Safe if there are no Warnings or Excursions to note.
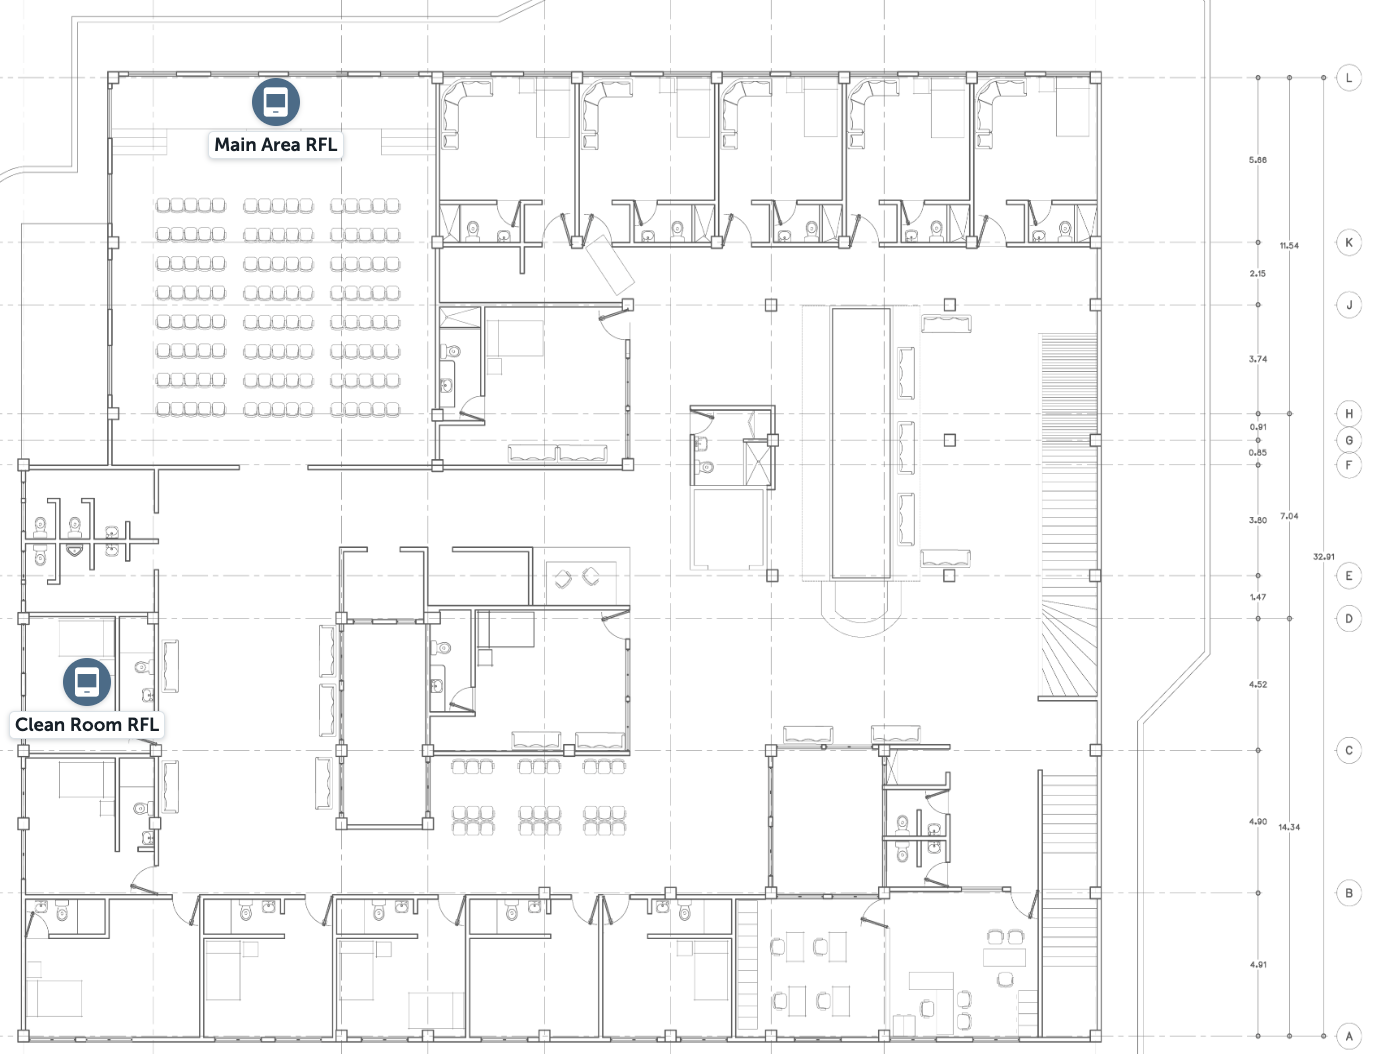
  • Floor Plan – Floor Plan allows you to monitor the live status of equipment or specific data loggers which can be placed on a schematic of your space. Be sure to upload a floor plan via the Monitoring Points > Floor Plans > Add Floor Plan. Read more about floor plans here.
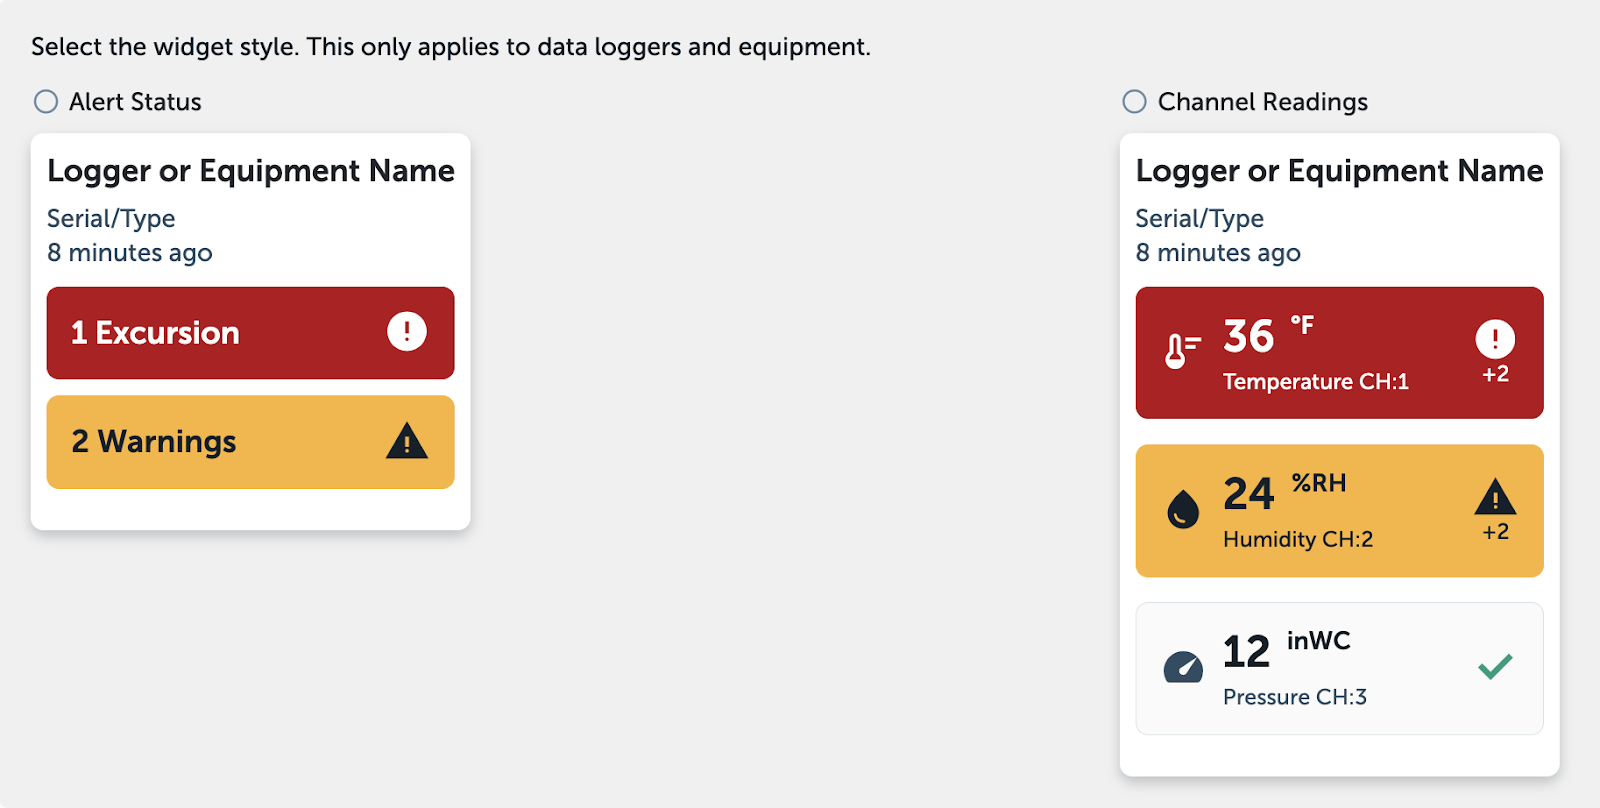
  • Logger or Equipment – View a data logger or equipment from selected monitoring points. In the widget preview, you may decide if you want to see Alert Status or Channel Readings. 
  • Channel – Allows you to monitor specific channels (Temperature, Relative Humidity, Air Pressure) separated from locations, loggers, or equipment. A great option for focusing in on near real-time data for a single monitoring point. 
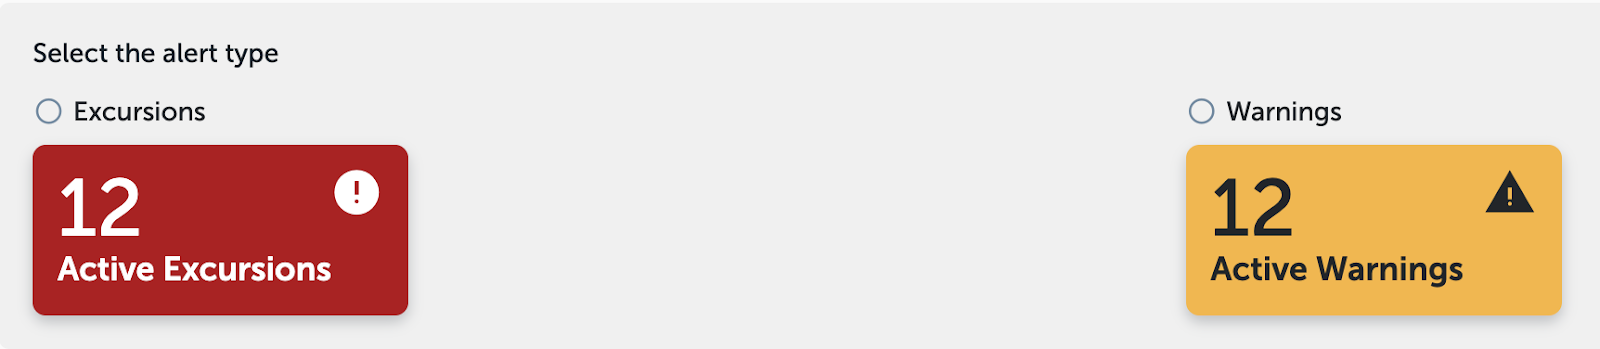
  • Alerts – This widget presents at a glance views of active Warnings or Excursions for the entire account. 

To add widgets:

  1. From the Custom Dashboard, choose Edit
  2. Select Add Widget, then choose the widget type you would like to add. 
  3. Once you have selected the widget type, you will see a preview where when applicable, you may need to make a selection on the style and contents of the widget.
  4. Choose Add, then the widget will be added to your Custom Dashboard. 

To resize or rearrange widgets:

  1. From the Custom Dashboard, choose Edit.
  2. In the Edit view, you have the ability to click and drag the widget tiles. Keep in mind the display area cut-off zones.  
  3. The bottom right corner of the widget tile has a small carrot, which can be used to adjust the size of the widget tile. 
  4. To delete a widget, select the overflow menu (the dots) in the top right of the tile and then choose Delete. 
  5. Any changes will be saved automatically. 

Sharing and Transferring Ownership of a Dashboard #

About the sharing of dashboards

  • Custom Dashboards may be shared with others or shared with specific devices which enables displaying the dashboard at a central monitoring hub, for example. 
  • Ownership of Custom Dashboards may also be transferred to another user, useful if a dashboard owner were to leave an organization. 
  • Dashboard sharing can be configured for different security needs

To share a custom dashboard:

  1. In the top right corner of the page, select Share.
  2. From the popout, choose your desired privacy settings
    1. Only devices from approved IP addresses below and I can view – This is the most secure option.
    2. Anyone from my organization can view.
    3. Anyone with the link can view – This is the least secure option.
  3. If Only devices from approved IP addresses was selected, identify approved addresses with the Add IP Address field
  4. Once you have finished adjusting the settings, select Copy Link. 
  5. Share the link to the Custom Dashboard with applicable users. 

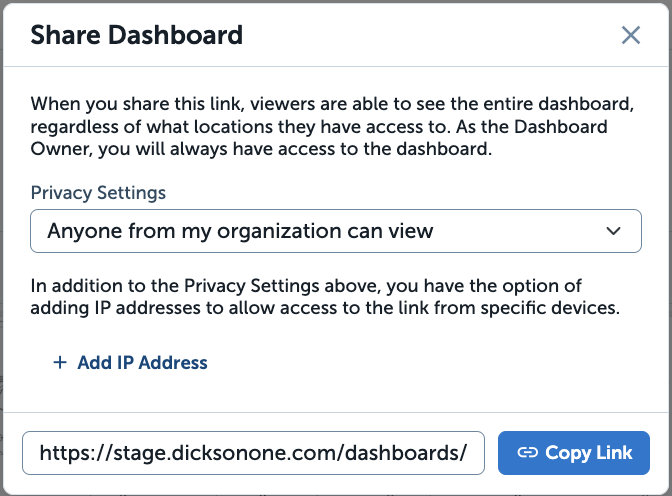
Note: depending on the settings configured above, the dashboard may be visible outside your organization. Review the instructions and settings carefully to ensure confidentiality. 

To transfer ownership:

  1. From the Custom Dashboard, choose Edit. 
  2. In the Edit view, select the Settings tab. 
  3. Scroll down to the bottom of the Settings tab and choose Transfer Ownership.
  4. In the popout, choose the desired Dashboard Owner from the dropdown menu. 
  5. Finalize the change by selecting Transfer. 

Deleting a Custom Dashboard #

  • Custom Dashboards may also be deleted, providing the ability to remove obsolete dashboards or keep the dashboard dropdown organized with only dashboards that are needed. 

To delete a custom dashboard: 

  1. From the Custom Dashboard, choose Edit. 
  2. In the Edit view, select the Settings tab. 
  3. Scroll down to the bottom of the Settings tab and choose Delete Dashboard.
  4. In the popout, choose Delete.
Was this article helpful?
Updated on July 2, 2024
Floor PlansDashboards
Table of Contents
  • About Custom Dashboards
  • How to Create a Custom Dashboard
  • Widgets
  • About Dashboard Widgets
  • Sharing and Transferring Ownership of a Dashboard
  • Deleting a Custom Dashboard
Dickson environmental monitoring & compliance experts logo

Subscribe to our Newsletter

ADDRESSES

United States flag icon, stars and stripes design circle crop

USA

930 S Westwood Ave,
Addison, IL, 60101, USA
Phone: (630) 563-4209
Email: supportinfo@dicksondata.com

French flag icon, blue, white, and red vertical stripes

France

720 rue Louis Lépine,
34000 Montpellier, France
Phone: +33(0)4 99 13 67 30

Malaysian flag icon, red and white stripes, crescent & star

Malaysia

Dickson Unigage Sdn. Bhd.
Wisma LYL, G-02
No. 12. Jalan 51A/223, Section 51A
46100, Petaling Jaya, Selangor
Phone: +60374940758
Email: contact@dicksondata.my

PRODUCTS

  • Data Loggers
  • Accessories
  • Disclaimer

RESOURCES

  • About Us
  • Terms of sale
  • Contact Us
  • Blog
  • Imprint

SOCIAL MEDIA

Facebook

© 2026 Dickson. All Rights Reserved.

Privacy - Terms

Manage Consent
To provide the best experiences, we use technologies like cookies to store and/or access device information. Consenting to these technologies will allow us to process data such as browsing behavior or unique IDs on this site. Not consenting or withdrawing consent, may adversely affect certain features and functions.
Functional Always active
The technical storage or access is strictly necessary for the legitimate purpose of enabling the use of a specific service explicitly requested by the subscriber or user, or for the sole purpose of carrying out the transmission of a communication over an electronic communications network.
Preferences
The technical storage or access is necessary for the legitimate purpose of storing preferences that are not requested by the subscriber or user.
Statistics
The technical storage or access that is used exclusively for statistical purposes. The technical storage or access that is used exclusively for anonymous statistical purposes. Without a subpoena, voluntary compliance on the part of your Internet Service Provider, or additional records from a third party, information stored or retrieved for this purpose alone cannot usually be used to identify you.
Marketing
The technical storage or access is required to create user profiles to send advertising, or to track the user on a website or across several websites for similar marketing purposes.
  • Manage options
  • Manage services
  • Manage {vendor_count} vendors
  • Read more about these purposes
View preferences
  • {title}
  • {title}
  • {title}
0
    Your Cart
    Your cart is emptyReturn to Shop
    Continue Shopping